If you have ever shopped online, then you probably know the necessity and value of good product photos. It's a documented fact that items without photos rarely sell, and those with great photos FAR outsell those with average ones. I know personally, the photo is a make-or-break factor for me when I am shopping online. Now that I am on the other side as a shopkeeper, I want to make sure my pictures are as good as I can make them.
Though I have been a photographer for a while, product photography (also called table top photgraphy) is new to me. You might think "If you are a photographer, then you are a photographer.", but good product photography is it's own unique 'animal'. As a fine art photographer, my personal photography goal is to evoke a mood. I will even say that I try to create a bit of fantasy, frequently using soft focus, blur, antiquing, etc. I like to show the subject not as it is, but as I see it. Product photography is the opposite of that. With product photography, my goal is to sharply and accurately depict the subject for the buyer. The picture itself is not what they are buying. The product I am selling must be the center of attention. That said, I don't want an unappealing, boring, generic photo either, so my approach is to enhance the picture by adding props, background color and interesting light.
There are several successful styles of product photography for sure, but one rule they all have in common is good lighting. It is the #1 most important thing! Natural daylight or lights that mimic daylight are typically best. Some other general rules are...
- Avoid blur/shake - Use a fast shutter speed with lots of light or a tripod and carefully focus.
- Get close and fill the frame with the subject. It does not good to provide a photo if the subject is too small to show detail.
- Provide visual clues to show scale if possible. I photograph subjects next to US quarters especially for this purpose.
- Show multiple angles.
- Avoid harsh shadows and reflections. Don't use on-camera flash. It will just make an ugly flare.
- Dust and clean the products. Dust and fingerprints will show in well lit, close ups, so polish away!
TableTopStudio
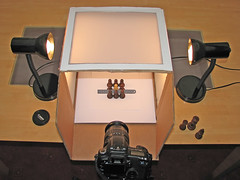
The simplest ways to instantly improve your small product photography is to invest in a light tent kit (or make your own- google "making a light tent"). Mine was $99 and included 2 tents (small & med), 2 cool & bright white lights on stands, white & black seamless backdrops, white and black acrylic shiny product tables in a wheeled case. How does a kit improve pics? Well...
- The light tent diffuses the light so harsh shadows are minimized
- The shiny product tables show appealing reflections of the product. This looks professional and it is a common style seen in magazines.
- The seamless backdrops make the product appear to be floating and definitely makes them the focal point. It also provides a blank surrounding so shiny products do not reflect objects and colors.
- The white light accurately depicts colors and mimics full spectrum daylight which is naturally appealing to most people.


I use my light tent kit for every product photo, but I typically do add color backgrounds to mine as I want the thumbnails to pop off the page of the white website where they are posted. You can buy cloth made specifically for photography backgrounds or use paper, fabric, a place mat or whatever you think would look nice with the product and make it appealing to your target buyer. I also add props to enhance the photo, but mostly to hold up the jewelry. You can also use museum wax or putty to hold things upright too. For lightweight items, you can use fish line to suspend it from the top of the light box.
Here's some samples of how backgrounds & props can be used:


The best way to learn is to look around at some online auctions and stores and pay attention to which photos really grab your attention and look professional, then try to mimic the look yourself.
