Monday, September 8, 2008
Addicting New Flickr Tool
http://symmetry.sytes.org/
This little application pulls flickr photos by tag and morphs them into sometimes beautiful and sometimes freakish images using some type of mirroring algorythm. It's pretty addicting when you are tired and bored.
Have fun!
Sunday, July 13, 2008
Learn Photoshop Online
There are classes offered at any self respecting art or vocational school and most community collages, but they can be pricey and time consuming. There is a lot you can learn from library books and online resources for free. I just added a resource on this blog offering some tips on PS that you might find helpful. Please check it out in the side bar.
Friday, July 4, 2008
SEEKING THE RAINBOW - A New Fine Art Print Released Yesterday
 Hello, I have just released a new art print today called "SEEKING THE RAINBOW". It is a digital painting made from 2 of my photographs worked together in Photoshop CS3. It is available as a fine art print with or without custom framing in my ImageKind Gallery (under my photography name "Kamera Kat").
 (Note - It's difficult to see the rain in this small image. You can zoom in on the print on the ImageKind site.)
I would love to hear what you see in the picture. Leave a comment! =o)
This is what I see... When the storms of life rain down, delight in the promise of finding a new rainbow at the storms edge. Then, realizing that the rainbow did not exist until this storm created it, we can be thankful for the storm even while we are still in it.
"And God said, "...Whenever I bring clouds over the earth and the rainbow appears in the clouds, I will remember my covenant between me and you and all living creatures of every kind. Never again will the waters become a flood to destroy all life." Gen. 9:14
Sunday, June 29, 2008
Free Publicity for my photography & art! I'll take it!

 Well this post is about 1 month overdue, but I'm posting it anyway because I am exicted. A fellow ImageKind member emailed to tell me that a daily art review blog called "Art Sweet" featured me as the artist of the day May 26, 2008. What a nice surprise!
Quote: "Today’s featured artist is Lisa Whipkey. Lisa is a wonderful multimedia artist. Her use of color, texture and layering is simply fantastic! My favorites are “Love Grows”, “Opium” and “Venice Vase”. - ArtSweet"
I have been blessed to have my work featured on many blogs in the last couple of years (love that free publicity!) and I have had a few kind art reviews too, but I am always excited every time I am ego surfing (google myself) and find that someone liked my work enough to give it some special attention. I believe every artists work speaks to someone and we all like that affirmation that someone out there "gets" what we do. So thanks Art Sweet for making my day!
Sunday, June 22, 2008
My Pix published on iPhone...Cool
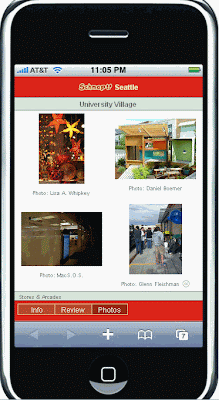
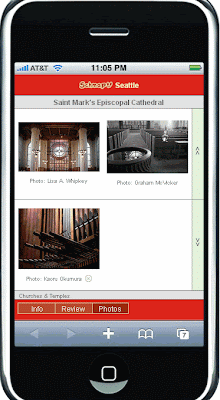 A while back a company called Schmap - Beyond the map" contacted me for permission to use two of my Seattle area photos on their website which is a electronic map of the whole country where you can select maps down to the neighborhood level and view the shops, sites, shopping, etc. before you ever get there.
I just received notice that they are now using my pix on the new Schmap Mobile for iPhone. This is what it looks like... The U village shot and the St. Marks Cathedral shot in the upper left of the images are mine. Click to enlarge. Kinda cool I think!
Wednesday, April 16, 2008
Photographing Small Products for Your Online Store
If you have ever shopped online, then you probably know the necessity and value of good product photos. It's a documented fact that items without photos rarely sell, and those with great photos FAR outsell those with average ones. I know personally, the photo is a make-or-break factor for me when I am shopping online. Now that I am on the other side as a shopkeeper, I want to make sure my pictures are as good as I can make them.
Though I have been a photographer for a while, product photography (also called table top photgraphy) is new to me. You might think "If you are a photographer, then you are a photographer.", but good product photography is it's own unique 'animal'. As a fine art photographer, my personal photography goal is to evoke a mood. I will even say that I try to create a bit of fantasy, frequently using soft focus, blur, antiquing, etc. I like to show the subject not as it is, but as I see it. Product photography is the opposite of that. With product photography, my goal is to sharply and accurately depict the subject for the buyer. The picture itself is not what they are buying. The product I am selling must be the center of attention. That said, I don't want an unappealing, boring, generic photo either, so my approach is to enhance the picture by adding props, background color and interesting light.
There are several successful styles of product photography for sure, but one rule they all have in common is good lighting. It is the #1 most important thing! Natural daylight or lights that mimic daylight are typically best. Some other general rules are...
- Avoid blur/shake - Use a fast shutter speed with lots of light or a tripod and carefully focus.
- Get close and fill the frame with the subject. It does not good to provide a photo if the subject is too small to show detail.
- Provide visual clues to show scale if possible. I photograph subjects next to US quarters especially for this purpose.
- Show multiple angles.
- Avoid harsh shadows and reflections. Don't use on-camera flash. It will just make an ugly flare.
- Dust and clean the products. Dust and fingerprints will show in well lit, close ups, so polish away!
TableTopStudio
The simplest ways to instantly improve your small product photography is to invest in a light tent kit (or make your own- google "making a light tent"). Mine was $99 and included 2 tents (small & med), 2 cool & bright white lights on stands, white & black seamless backdrops, white and black acrylic shiny product tables in a wheeled case. How does a kit improve pics? Well...
- The light tent diffuses the light so harsh shadows are minimized
- The shiny product tables show appealing reflections of the product. This looks professional and it is a common style seen in magazines.
- The seamless backdrops make the product appear to be floating and definitely makes them the focal point. It also provides a blank surrounding so shiny products do not reflect objects and colors.
- The white light accurately depicts colors and mimics full spectrum daylight which is naturally appealing to most people.
I use my light tent kit for every product photo, but I typically do add color backgrounds to mine as I want the thumbnails to pop off the page of the white website where they are posted. You can buy cloth made specifically for photography backgrounds or use paper, fabric, a place mat or whatever you think would look nice with the product and make it appealing to your target buyer. I also add props to enhance the photo, but mostly to hold up the jewelry. You can also use museum wax or putty to hold things upright too. For lightweight items, you can use fish line to suspend it from the top of the light box.
Here's some samples of how backgrounds & props can be used:
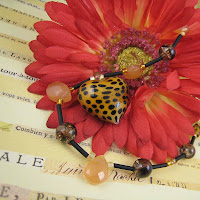

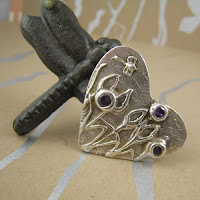
The best way to learn is to look around at some online auctions and stores and pay attention to which photos really grab your attention and look professional, then try to mimic the look yourself.
Sunday, March 23, 2008
The Power of a Picture - Photo Contest - Human Impact on the Environment
If you agree, please vote for me by April 8, 2008!!! Click on the pic to vote. Thanks!!